
Congratulations on Your New Online Store!
You've decided to add an online presence for your Bricks & Minifigs franchise — that's a smart move. Your website works 24/7, captures emails, shows up in Google searches, and lets customers browse your full inventory without driving across town. We'll be here the whole way to help you be successful.
This guide walks you through everything — getting started, preparing your inventory while we build, and running your store day-to-day after launch. Your role is straightforward: fill out the intake form, get corporate approval, and prep your inventory. We handle the rest.
Step 1: Fill Out the Intake Form
Everything starts here. Our intake form captures your store information, domain name preferences, POS system details, and shipping setup — all in one place.
Fill out the intake form: app.carpelligo.com/setup
You'll need to have ready:
- Your store name, address, and business entity info (EIN, state tax ID)
- Your Heartland / Global POS web URL (the URL you use to log into your POS back office)
- 2–3 domain name options in order of preference
- Your social media links (Facebook, Instagram, etc.)
- Who should receive order notifications and how (email and/or text)
Step 2: Domain Approval from Corporate
Before any work begins, BAM corporate must approve your domain name. We'll handle this for you. Once you submit the intake form with your domain options, we'll send the approval request to BAM corporate on your behalf — one less step for you.
Important: We won't purchase the domain or begin the build until we have written approval from corporate. Once approved, we start immediately — purchasing the domain is included in our fee.
Step 3: We Build Your Store
While you're preparing your inventory (see the Item Prep tab), we're building your Shopify store. Here's what happens on our end:
- BAM Approved theme — custom two-tier header, responsive mega menu, and official BAM corporate styling.
- Collection architecture — New, Used, Certified, Bulk, and theme-based collections that auto-organize your inventory.
- Shipping engine — price-tiered domestic shipping based on order value. No manual weight entry needed.
- Cart conversion — announcement bars and free-shipping prompts to boost average order value.
- Quality assurance — we test everything before hand-off.
Step 4: Select Your Store Collections
Once the build is complete, you'll select which collections appear in your store's navigation menu. Our collection selector lets you pick up to 40 collections from a list of 140+ options — organized alphabetically with tags for smart filtering.
Select your collections: app.carpelligo.com/collections
Need to change your selections later? No problem — just complete the form again with your updated choices. We'll be notified automatically and update your store menu.
Owner Settings
After you receive ownership via transfer from Carpelligo, you'll need to enter items that make your store functional. To do this, go to the Settings "gear" icon on the lower left of the Admin area in Shopify. Click there and do the following:
General
Under the General tab — make sure all the company information is correct and save changes.
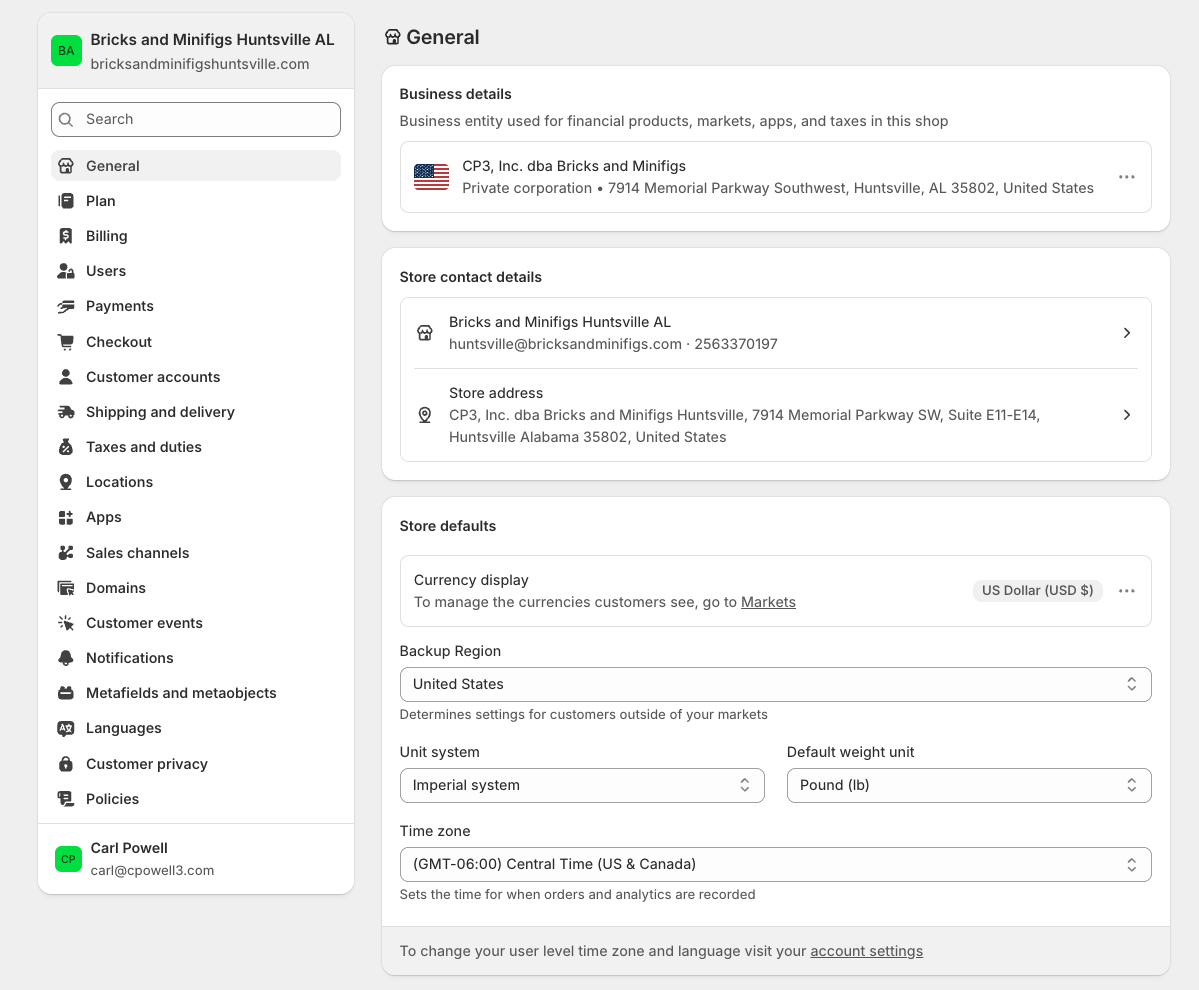
Settings › General — verify store details, address, currency, and time zone
Plan
Under the Plan tab — choose the Basic Plan for either $39/month or choose the annual rate of $348 to save $10/month ($29/month average).
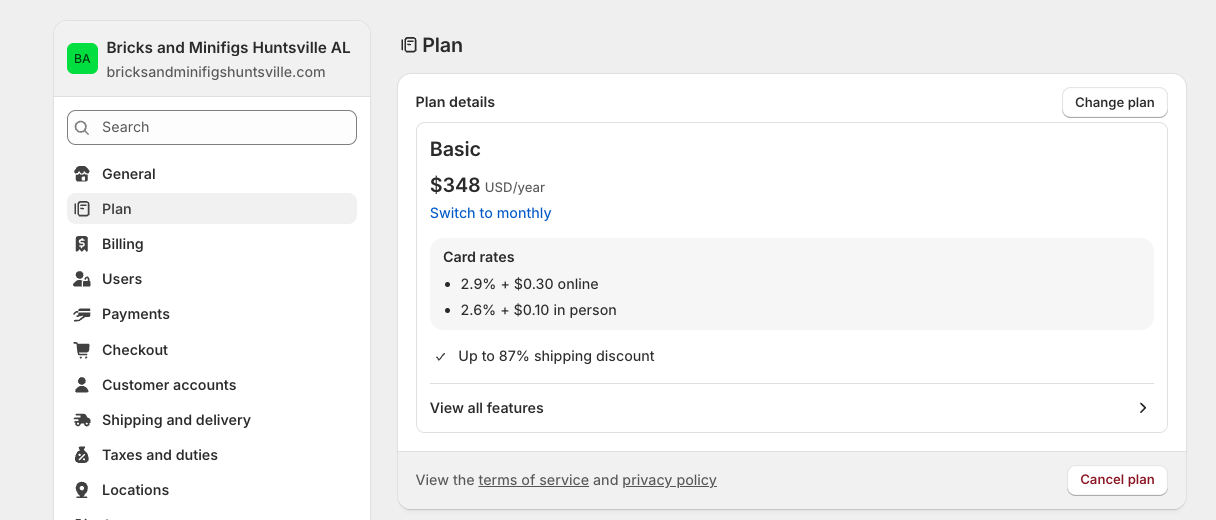
Settings › Plan — select Basic plan (monthly or annual)
Billing
Under the Billing tab — add a payment method for your Shopify-based charges (Basic fees plus any app charges).
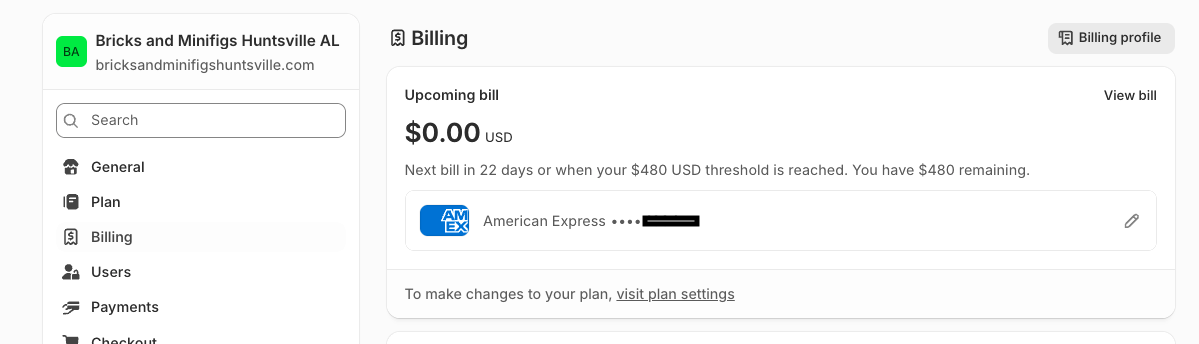
Settings › Billing — add a credit card for Shopify subscription and app charges
Payments
Under the Payments tab — set up using Shop Pay as your primary method of payment. Add a PayPal account if you have one as an option.
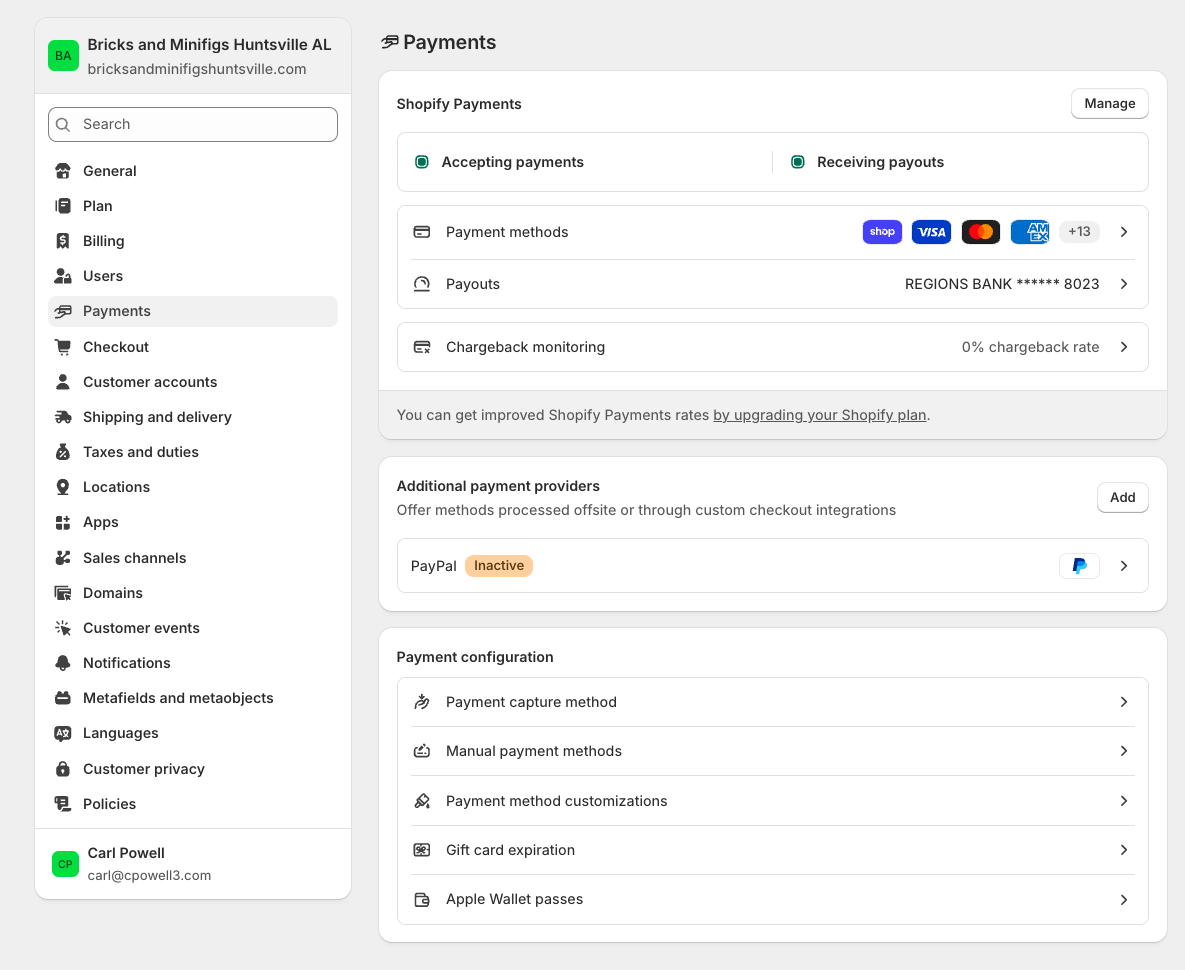
Settings › Payments — Shop Pay active, PayPal optional
Taxes and Duties
Under Taxes and Duties — choose the state in which you collect taxes (if applicable). Shopify will collect taxes for you.
Note: Most states do not require you to file taxes if you do not have "nexus" in their state until you reach a certain level. Check with your accountant if you begin to sell a lot into a particular state.
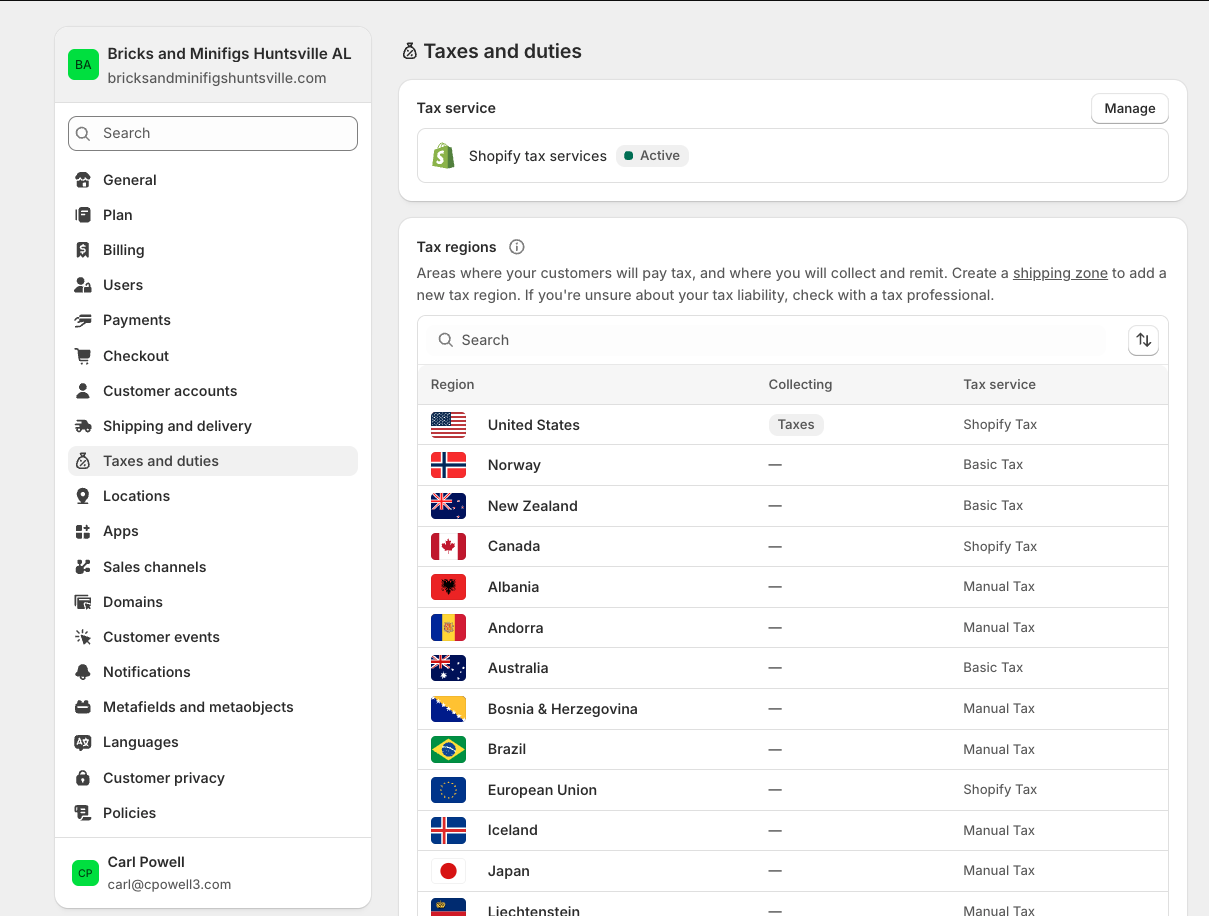
Settings › Taxes and Duties — select your tax collection state
Save all changes as you go. After completing these steps, your site can go "Live."
Going Live
To take your store live, close the Settings window (x on upper right) and click on Online Store in the left column. Under Online Store, select Preferences. There you can turn off the password protection for the site.
Congratulations! Your store is now LIVE!
Ready to get started? Head over to the Item Prep tab to learn what you need to do in your POS while we build. Or download the printable checklist to keep track of every step.
Preparing Your Inventory in Global POS
While we're building your Shopify store, you need to prepare your inventory in Heartland Global POS. This is the critical path — the store cannot go live until your inventory is properly configured and synced.
What needs prepping: Every New In Box (NIB) item — including Retired NIB — that you want on your Shopify store must be fully updated in Heartland with all required fields and photos.
What does NOT need this: Minifigures, Used Sets, Certified Sets, Non-LEGO items, Accessories, or Bulk items. These are handled differently.
Add Custom Fields in Global POS
These three custom fields must be added once to your system before updating individual items. Navigate to:
Settings → Custom Fields → Items
| Field Name | Type | Notes |
|---|---|---|
| Tags | Text Field | Will contain values like: Add, [Theme], NIB, [retired]. The word "Add" triggers the Shopify sync via Mortar. |
| Product Type | Text Field (Dropdown) | Options: Interlocking Blocks / Accessory / Other |
| Brand | Text Field | Usually LEGO® — note this is different from the Vendor field. |
Note: A 4th field — "Category for Google" — is completed during the final listing step (usually "Building Toys" or "Construction Set Toys"). No setup required now.
Update Each NIB Item
Every NIB item destined for Shopify must have all fields below completed. Fields marked with * are required by LEGO and apply to all NIB sets.
| Field | What to Enter |
|---|---|
| Item # | LEGO set number |
| Primary Vendor | Used purchase, LEGO, Toyhouse, or BAM |
| Description * | [Set #] LEGO [set name as LEGO/BrickLink uses it] — nothing else |
| Long Description * | List any condition notes first. Then use LEGO's description from the Specifications section on LEGO.com, or find it online. |
| Cost / Price | Verify both are entered and correct |
| Taxable | Yes |
| UPC * | Use the actual UPC for the set number. Search: "LEGO [set#] UPC" to find it. |
| Department | New Sets |
| Category | NIB |
| Series | LEGO Series — e.g. Star Wars, Friends, City, etc. |
| Tags (Custom Field) | USE LOWERCASE WITH HYPHENS. Shopify collections are case-insensitive, but theme code, apps, and filters are not — consistency prevents broken filters. NIB items: Add, [series-tag], nib, [retired if applicable] Certified items: Add, [series-tag], certified, [retired if applicable] Examples: Add, star-wars, nib | Add, star-wars, nib, retired | Add, friends, certified, retired |
| Product Type (Custom Field) | Interlocking Blocks |
| Brand (Custom Field) | LEGO® |
| bricklink_id | Set number plus "-1" — example: set 75334 → 75334-1 |
| Photos * | Minimum 2 photos required (per the 2026 LEGO® E-Tailer Guide): 1. Box front 2. Built set More photos are better for Google Listings. Photos may be downloaded from Patron using the Assets tab in the Catalog. |
Key habit: Every time you add a new NIB, Certified, or Retired NIB set to your POS, fill in all the required fields before you put it on the shelf. That way it's always ready to go to Shopify whenever you choose. You'll thank yourself later.
Save time with our Inventory Cleanup Tool! Instead of manually fixing titles, brands, and categories one by one, use our free online tool to clean up an entire Heartland export in seconds. It normalizes titles, fills missing fields, classifies NIB vs NIB Retired, and returns a file ready for re-import.
Try it now: Go to the Inventory Cleanup tab for step-by-step instructions, or visit app.carpelligo.com/inventory directly.
Once your inventory is prepped, move to the Day-to-Day tab to learn about going live and running your store. Or download the printable checklist.
Going Live & Day-to-Day Operations
Mortar POS Sync — We Handle Setup
Once your inventory is fully updated and we confirm the Shopify store is ready, we activate Mortar — the integration that keeps your Heartland POS and Shopify store in sync in real time.
Good news: We install and connect Mortar to your POS before turning the site over to you. There's nothing for you to do on the sync side. The only step on your end is choosing the Grow Plan in Mortar once you've set up your Shopify payment settings. We'll walk you through that final step.
Here's what Mortar does automatically:
- Syncs inventory levels, pricing, and product data between Global POS and Shopify in real time.
- Any item with the tag "Add" in the Tags field gets pushed to Shopify. (Tags are comma-separated — e.g.
Add, NIB, Star Wars) - When an item sells in-store, Mortar removes it from Shopify automatically.
- Restocked items reactivate on their own — no action needed.
Mortar is billed separately at $1,200/year (invoiced directly to you by Mortar). We confirm everything is syncing correctly before handing off the store to you.
Activating Draft Items in Shopify Admin
When an item has the tag "Add" in its Tags field, Mortar pushes it to Shopify — but in Draft mode. It won't be visible to customers until you activate it. We recommend working through your draft items every few days, or whenever you've added a batch of new inventory. It takes less than 10 minutes once you've done it a couple of times.
- Open your Shopify Admin
- Go to: www.yoursite.com/admin
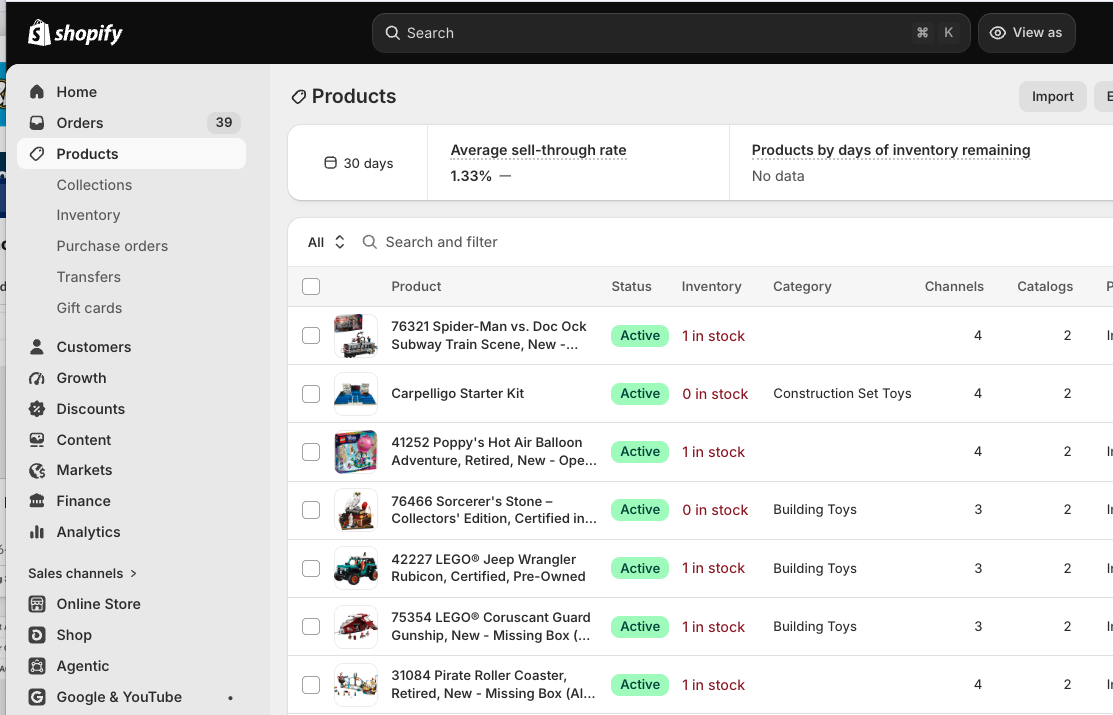
Shopify Admin — Products page
- Filter to Draft items
- In the left menu, click Products.
- Click the Search and Filter field above the product list, type "Status", select it from the dropdown, then choose Draft from the checklist. This shows only unpublished items.
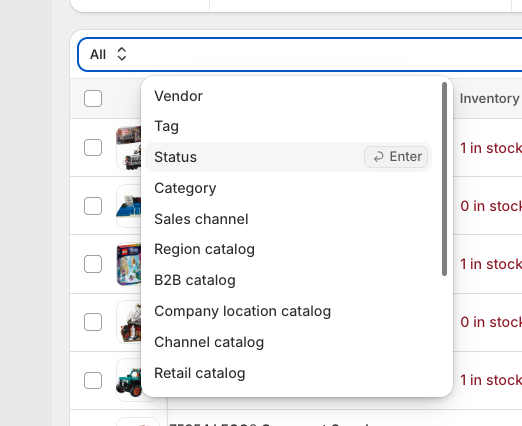
Step 1: Click the filter field and select Status
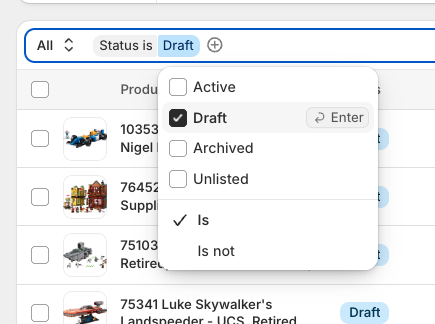
Step 2: Check Draft from the status options
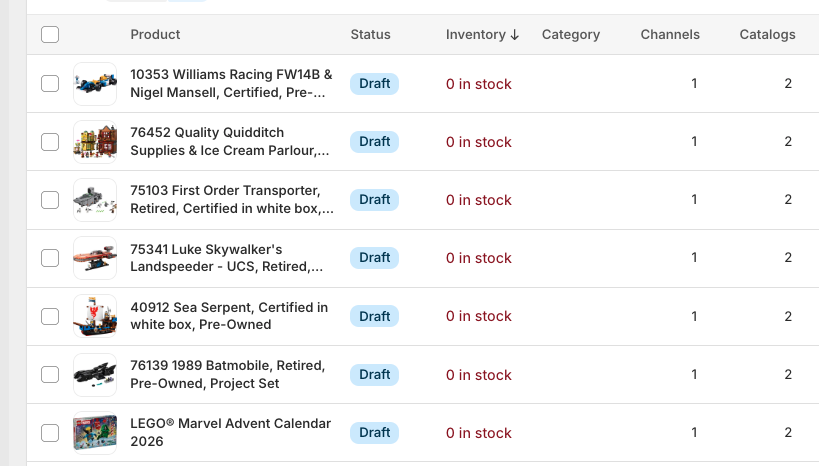
Result: Only Draft products are now shown
- Sort by Inventory (highest to lowest)
- Click the Inventory column header once (sorts low-to-high), then click it again (sorts high-to-low). Items with stock available will float to the top — those are the ones you want.
- Select items to publish
- Check the boxes to the left of each item that has quantity showing.
- Only select items whose photos have transferred correctly. If an item is missing a photo, skip it and go back to fix it in the POS first.
- Open Bulk Edit
- Once items are selected, a Bulk Edit button appears at the top of the list. Click it.
- You'll see a spreadsheet view of your selected items.
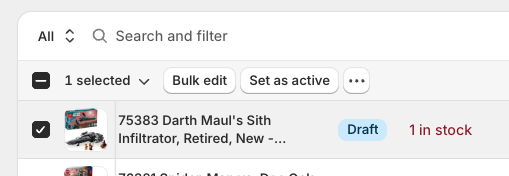
Select items, then click Bulk edit
- Add the Sales Channels column (first time only)
- Click the Columns button (upper right) to see the column list.
- Scroll to the Publishing section and check Sales Channels. You can also check Product Type while you're there to verify those entries look correct.
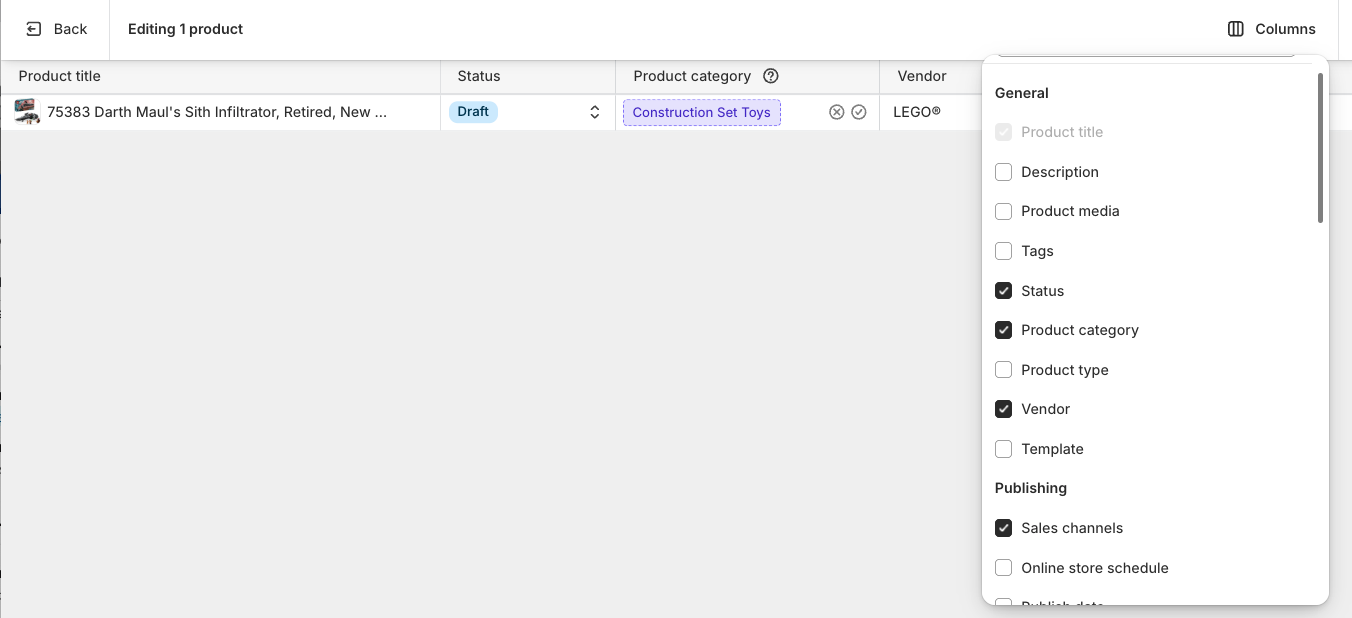
Click Columns, scroll to Publishing, check Sales channels
- Activate all items
- Click and drag down the Status column to select all fields. Click the first one and change it to Active — this updates the entire selection at once.
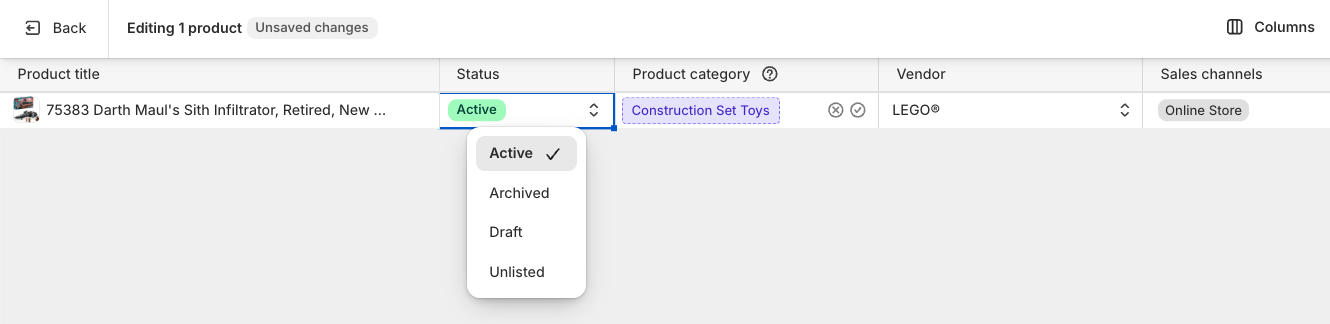
Select all Status cells, then change the first one to Active — all selected items update at once
- Set Sales Channels
- Select all items under Sales Channels, then click the first one to set which channels to enable:
- Online Store — your website.
- Google & YouTube — lists your products in Google Shopping.
- Shop — Shopify's own app-based marketplace.
- Facebook/Instagram — if you have a connected Facebook store.
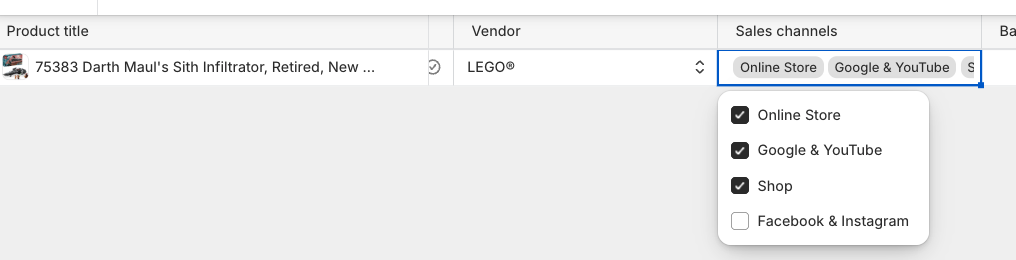
Click a Sales channels cell to open the dropdown and check the channels to enable
- Verify before saving
- Check that all Category fields show either "Construction Set Toys" or "Building Toys" (some minifigs or buildable figures may show "Action Figures" — that's fine).
- The Vendor column maps to your Brand field in the POS. It should show the brand name (e.g. LEGO®).
- Confirm pricing looks correct for each item.
- Save
- Click the Save button (upper right). Your selected items are now live on your Shopify store.
Tip: Bookmark this filtered, sorted view. The filter settings are stored in the URL — drag the URL to your bookmarks bar after setting it up the first time. Next session you can skip straight to Step 4.
Done. Repeat every few days as new inventory comes in. Once it's a habit, the whole process runs in under 10 minutes.
What Do I Do When Something Sells?
When an item sells on your website, you'll receive an email or text notification. We set up notifications to go to whoever you designate — one person or several. That person is responsible for going to the shelf immediately and pulling the item so it cannot be sold in-store before it ships.
Keeping inventory accurate is not optional. If an item sells online and you no longer have it in stock, you will have to cancel the order. That creates a dissatisfied customer and can hurt your store's reputation and your search rankings over time.
Shipping
Shopify has shipping built in — you can see all orders that need to be shipped, purchase postage, and print labels without leaving the platform. Shopify offers discounted rates compared to walking into a UPS Store or Post Office.
That said, we recommend setting up ShipStation as your shipping platform.
Why ShipStation?
- Connects directly to Shopify — your orders pull in automatically.
- Access to more carriers and services than Shopify shipping alone.
- Some of the lowest shipping rates available.
- Can be used to ship anything — not just Shopify orders. Letters, returns, other packages.
- Simple, easy-to-use interface.
- Starts at $9.95/month for up to 50 shipments. Automatically upgrades to $19.95/month if you exceed 50 — which is a good problem to have.
ShipStation also supports automatic postage funding. When your balance runs low, it charges your credit card and reloads automatically. A $100 auto-reload typically covers 5–10 shipments depending on package size and destination. If you have a card that earns cash back or points on shipping purchases, that combination works well.
Packing and Shipping Each Order
- Use an external box large enough for the item(s) with sufficient packing material to prevent crushing in transit. LEGO boxes are sturdy but not shippable on their own.
- Print the packing slip and place it inside the box before sealing.
- Seal the box securely with shipping tape.
- Print and apply the shipping label to the outside of the box.
- Drop it at a UPS Store or Post Office. With a preprinted label, you typically do not have to wait in line — just hand it over or drop it in the bin.
ShipStation and Shopify both support standard desktop printers, but we recommend a dedicated 4x6" thermal label printer. It's faster, uses no ink, and the labels are purpose-built for shipping. It pays for itself quickly.
Order Fulfillment and Tracking
Once the label is scanned by the carrier, tracking becomes active automatically. ShipStation or Shopify will mark the order as Fulfilled and send the customer a tracking notification.
Aim to ship the same day or next business day. Fast fulfillment builds your reputation with customers and improves your standing in Google Shopping results — both of which drive more sales over time.
For ongoing tips on keeping your store active, findable, and efficient, check the Best Practices tab. Or download the printable checklist.
Best Practices for Your Shopify Store
Your store is live — now what? These best practices keep your store active, findable, and efficient. We've put together a detailed guide covering email linking, inventory management, customer routing, Google Business Profile, and a monthly checklist.
Link Your Store Everywhere
Every email you send should link to your store — email signatures, newsletters, party confirmations, order follow-ups. It's the single highest-ROI thing you can do, and it costs nothing.
Drive Customers to the Website
When customers call to ask if you have a set, send them to your website instead. It captures emails, builds search ranking, and trains customers to check the site first.
Keep Inventory Current
Upload new inventory as you add it to the POS. Don't delete sold items — out-of-stock items still bring Google traffic. Mortar handles the sync automatically.
Collect Emails Relentlessly
Ask every customer to sign up for the loyalty program at checkout. Make sure your newsletter signup is visible on the website. OneShopRetail captures emails automatically.
Use Google Business Profile
Keep hours, address, and phone number current. Post photos monthly. Link your Shopify store in the website field. Ask happy customers to leave Google reviews.
Watch Your Analytics
Check Shopify Analytics weekly — visitors, orders, top sellers. Use Google Search Console to see what people search for when they find your store.
Want help keeping up with SEO? We offer a done-for-you SEO service that handles alt text, product titles, meta descriptions, sitemaps, and more. Learn about our SEO services →
Heartland Inventory Cleanup Tool
Clean and standardize your Heartland POS inventory export in seconds. Upload your Excel file, and our tool automatically fixes titles, fills missing fields, classifies items, and returns a file ready for re-import.
Quick start: Go to app.carpelligo.com/inventory, upload your Heartland export (.xlsx), and download the corrected file. That's it.
How to Use the Tool
Create the Export Report in Heartland POS
Before you start: Make sure you have created the three custom fields needed for export: Tags, Product Type, and Brand. These are set up once in your POS under Settings → Custom Fields → Items. See the Item Prep tab for details on creating these fields.
Follow these steps to build a report you can export and clean:
- Go to Reports / Analysis in your Heartland Global POS back office.
- Set the date range and filter by category. Change the date range to at least the last 12 months. Then add a filter condition: Category is equal to the group you plan to export (e.g., NIB, NIB Retired, Certified, etc.).
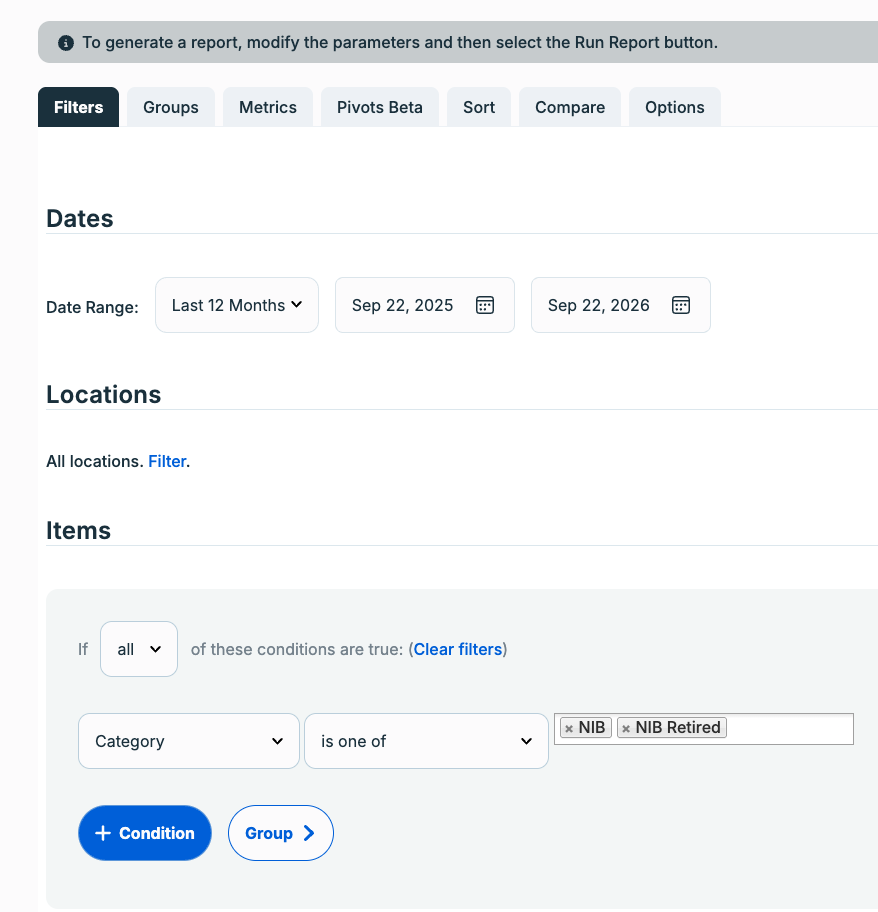
Set date range to 12+ months, then add Category filter condition
- Switch to the Groups tab and select all the following items: Item #, Item » Description, Item » Department, Item » Category, Item » Tags, Item » Brand, Item » Default Cost.
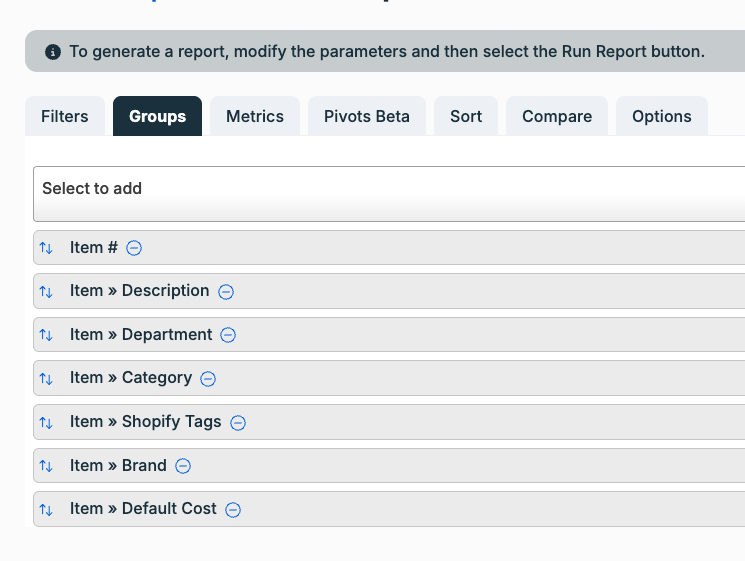
Groups tab — select all seven fields shown above
- Go to the Metrics tab and make sure at least one metric is selected. Source Sales » Net Qty Sold is fine — you won't use it, but at least one metric is required to run the report.
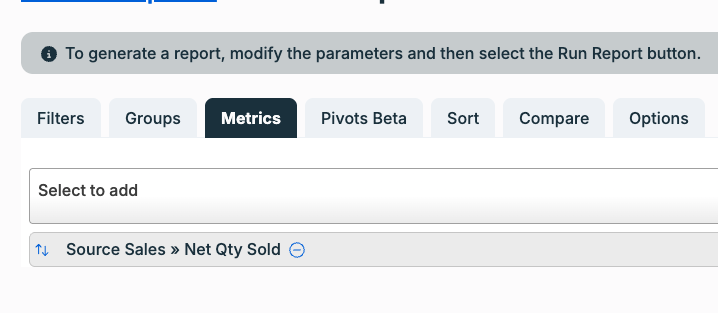
Metrics tab — select Source Sales » Net Qty Sold
- Run the report. Click the Run Report button to generate your inventory list.
- Save the report as something recognizable, like "Inventory to clean."
- Export the list and upload it to our Inventory Cleaner using the steps below. You can change the category filter and repeat this process to export other product groups (Certified, etc.).
Upload the File
Go to app.carpelligo.com/inventory. Either click to select your .xlsx file or drag and drop it into the upload zone. Optionally enter your email address to receive a download link.
Process
Click "Process Inventory File." The tool runs automatically -- usually taking 10-30 seconds depending on file size. You'll see a summary of all changes made.
Download & Review
Download the corrected file. Review any flagged items (non-LEGO products, missing year data). The download link is valid for 2 hours.
Re-import to Heartland
Import the corrected .xlsx file back into Heartland POS using the standard import function. Only fields present in the file will be overwritten -- your existing photos, prices, and other data remain untouched.
How to re-import: Go to Inventory / Items in Heartland, click the Import button at the upper left, and select the downloaded file to import. Follow the on-screen prompts to complete the process.
What the Tool Does
| Step | What It Does | Example |
|---|---|---|
| Strip Metadata | Removes report header rows (locations, filters, dates) so the file starts with column headers | Rows 1-8 removed, headers on row 1 |
| Clean Headers | Strips "Item: " prefixes, renames "Vendor" to "Primary Vendor" for import compatibility | "Item: Description" → "Description" |
| Title Normalization | Ensures every description follows the format: Set# LEGO Set Name | "Creative Bricks 11007" → "11007 LEGO Creative Bricks" |
| Special Characters | Removes non-breaking spaces, fixes lowercase "Lego" → "LEGO", removes stray ® after LEGO (keeps ® on licensed brands like F1®) | "Lego 11007" → "LEGO 11007" |
| Brand Validation | Fills blank Brand fields with "LEGO®" | Blank → "LEGO®" |
| Vendor Validation | Fills blank or "No Vendor" entries with "Trade" | "No Vendor" → "Trade" |
| Category Normalization | Converts "Miscellaneous" or "Aftermarket" to "Custom & Accessories" | "Miscellaneous" → "Custom & Accessories" |
| Department Classification | Classifies each item: New Sets, Minifigs, Custom & Accessories, or Bulk | Keychains → "Custom & Accessories" |
| Condition Classification | Determines NIB vs NIB Retired using Rebrickable year data (28,000+ sets in database). 2025+ = NIB, 2024 and earlier = NIB Retired | Set from 2021 → "NIB Retired" |
| Product Type | Classifies as Interlocking blocks, Accessory, or Other | Display case → "Accessory" |
| Flag for Review | Flags non-LEGO items, items with no Rebrickable match, and validation issues for human review | "25 Minifigure Display Case" → flagged |
| Tag Population | Populates blank Tags with theme + condition in lowercase-hyphenated format: [theme-tag], nib, [retired] or [theme-tag], certified, [retired]. Theme comes from Rebrickable's database (28,000+ sets). Does NOT add "Add" — you add that manually when ready to sync to Shopify. Existing tags are preserved. |
Blank → "star-wars, nib, retired" |
What's NOT changed: Photos, prices, cost, barcodes, and existing tags are not modified. The tool only overwrites fields present in the cleaned file. Photos sync separately through Mortar. Tags are only populated if blank — if you've already tagged items, those are preserved.
Tips for Best Results
- Export by department if your inventory is large (1,000+ items). This keeps processing fast and files manageable.
- Review flagged items before re-importing. The tool flags non-LEGO items and items it couldn't match in Rebrickable -- these default to "NIB Retired" but may need manual correction.
- Re-run after adding inventory. Any time you add new items to Heartland, export and clean again to keep your data standardized.
- Check the summary. The processing report shows exactly how many titles were fixed, brands filled, and items classified.
Note: The tool uses Rebrickable's database of 28,000+ LEGO sets to determine release years. About 2% of items may not be found (custom sets, very new releases, or non-LEGO items). These are flagged for your review and defaulted to "NIB Retired."
SetFinder -- Set Search for Your Store
SetFinder is a LEGO set search tool for your BAM store. Your customers search by set number at setfinder.net and instantly see what you have in stock -- with direct Add-to-Cart links to your Shopify store. When a customer looks for a set you don't carry, you get notified so you can source it. It syncs from your Shopify inventory automatically every day. No manual work required.
What It Does
| Feature | How It Works |
|---|---|
| Set Search | Customer enters a LEGO set number. SetFinder checks your store's inventory and shows what you have in stock, with condition and price. |
| Condition Badges | Each result shows the item's condition: New, Retired, Open Box, Damaged Box, Certified, Pre-Built, Build Only, Incomplete, or Project. |
| Add to Cart Links | Customers click straight through to your Shopify store to buy. No middleman, no commission -- the sale is yours. |
| Customer Request Alerts | When a customer searches for a set you don't have in stock, you receive an email with the set number and the customer's contact info. You decide whether to source it and get back to them. |
| Back-in-Stock Notifications | If a customer requests a set and you later get one in stock, SetFinder emails them automatically -- no extra work for you. |
| Daily Auto-Sync | SetFinder pulls your Shopify inventory every day. New items, price changes, and stock updates appear automatically. |
| Built-Set Visibility | Pre-Built, Build Only, Project, and Incomplete sets are indexed but only shown to customers if you turn on the setting. Your call. |
| Release-Date Holding | Tag a pre-release item with release-YYYY-MM-DD and it won't appear on SetFinder or your website until that date. |
No extra work: SetFinder reads what's already in Shopify. If your SKUs and titles follow the conventions below, everything works automatically. If they don't, items just won't match -- nothing breaks.
Tagging Your Items for SetFinder
SetFinder matches items by LEGO set number. The set number can come from the SKU or the title (first word). For used/built sets without a LEGO set number, it falls back to the Bricklink ID field. Here's how to tag items correctly in Heartland POS.
SKU Suffix System
NEW SETS Department -- use the LEGO set number as the SKU:
| Suffix | Meaning |
|---|---|
(none) |
New In Box |
-R |
Retired -- New In Box |
-O |
Open Box |
-D |
Damaged Box |
USED SETS Department -- use Heartland internal #, or LEGO set # if present, else title:
| Suffix | Meaning |
|---|---|
-C |
Certified Complete (verified complete, reboxed) |
-U |
Pre-Built (assembled, most of set, may be missing items) |
-B |
Build Only (main build or partial build included) |
-I |
Incomplete |
-P |
Project |
Rules
- Set number goes FIRST in the Title or Short Description field in Heartland. This is how SetFinder finds it. Example:
75313 LEGO AT-AT UCS - For used/built sets with no LEGO set number: Enter the set number in the Bricklink ID field. SetFinder uses it as a fallback.
- Tags flow from Heartland to Shopify automatically via Mortar. No double-entry.
- Built sets (Pre-Built, Build Only, Project, Incomplete): Mark as active in Shopify but unpublished from the Online Store channel. SetFinder reads them via API -- they appear in search but not on your website.
- Release-date tag: Use
release-YYYY-MM-DDto hold pre-release items until their street date. They won't appear on SetFinder or your website until that date. - Hide tag: Use
hideto exclude any item from SetFinder search entirely.
Key point: The suffix on your SKU tells SetFinder (and your staff) what condition the item is in. Without a suffix, SetFinder assumes it's New In Box. Wrong suffix = wrong condition shown to customers. Double-check before syncing.
Store Preferences
Each store controls how SetFinder handles built sets and out-of-stock items. Set your preferences at:
| Setting | What It Controls |
|---|---|
| Show Built Sets | When ON, customers searching for a set will see your built/used copies (Pre-Built, Build Only, etc.) with condition labels. When OFF, only new and certified items appear in search results. |
| Ship Built Sets | When ON, customers can purchase built sets online for shipping. When OFF, built sets are in-store pickup only -- the customer is directed to call the store. |
| Keep Sold-Out Listings Active | When ON, items that sell out remain on your website for SEO (they show as "Sold Out" but still bring Google traffic). When OFF, sold-out items are hidden from your store. |
Default: All three settings are OFF for new stores. Huntsville has "Keep Sold-Out Listings Active" turned ON. Change yours anytime at the portal link above.